Guitar Pedals
A guitar pedal is an electronic device that modifies or processes an electric guitar signal. Pedals range from simple effects such as distortion and tuning to much more sophisticated audio-processing systems.
A band pedal takes a different approach. Rather than primarily modifying the guitar signal, its purpose is to make a solo guitarist feel as though they are playing alongside a band. It can provide backing tracks such as drums, bass, and chords, allowing a guitarist to build a musical arrangement and improvise over it.
As an avid guitarist, I particularly enjoy improvisation. Learning popular songs is a great way to develop technique, but creating your own chord progressions and solos provides a different kind of creative freedom. With even a basic understanding of music theory, a guitarist can create an accompaniment and improvise over it without needing other musicians.
I first encountered a band pedal when a colleague let me try his. It was a sophisticated device that allowed me to record a chord progression and have it loop continuously while I played a solo over the top. It could also generate drum and bass accompaniment. This was my first experience with this type of pedal, and it immediately gave me an idea for a project: could I build my own?
Designing the Band Pedal
As a software engineer with an interest in electrical engineering and embedded systems, this project was an opportunity to combine several areas I wanted to develop further. It allowed me to apply engineering skills I had recently developed at BMW while simultaneously improving my embedded C++ and analogue electronics knowledge.
I began by defining the core functionality I wanted from the pedal:
- Record and loop one or more tracks in the background.
- Provide a tempo system with automatic minor adjustments to make recording easier.
- Include pre-recorded drum patterns that could play alongside recorded chords.
- Be fully operable by foot while playing guitar.
- Provide independent volume controls for each channel, such as guitar and drums.
- Provide adjustable input gain to accommodate different guitar pickups.
Choosing the Microcontroller
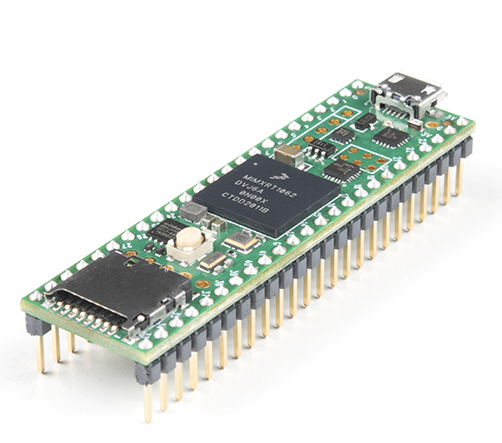
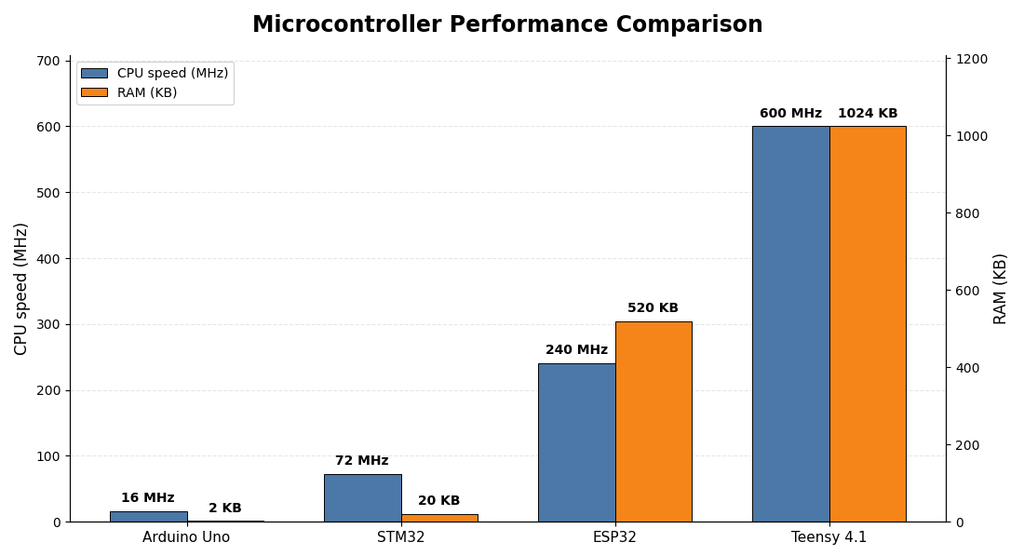
For the main controller, I chose the Teensy 4.1. It is relatively expensive compared with many microcontroller alternatives, but its combination of processing power, memory, and audio support made it particularly well suited to this project.
The Teensy 4.1 provided several important capabilities:
- An ARM Cortex-M7 processor with enough performance for high-sampling-rate audio processing and multiple concurrent tasks such as recording, playback, mixing, and drum timing.
- 1 MB of RAM, providing sufficient memory for recorded audio and drum samples.
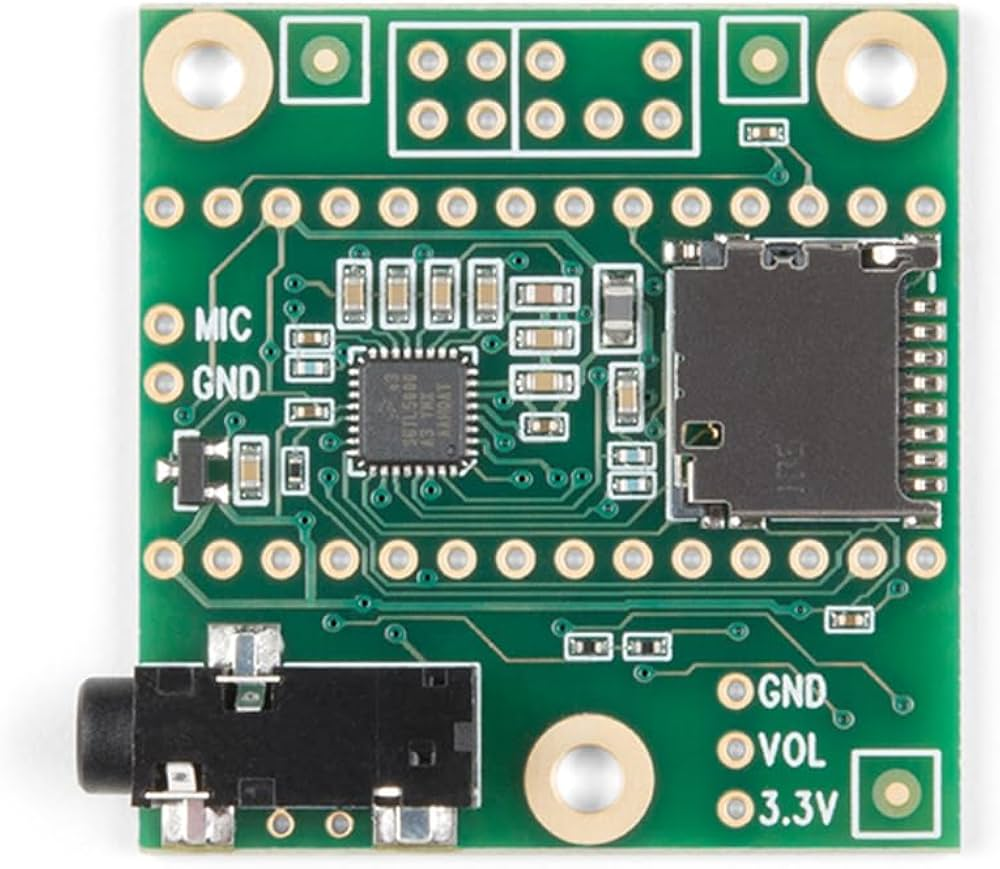
- A compatible audio board providing ADC and DAC functionality for audio input and output.
- A dedicated C++ audio library, simplifying the development of the audio-processing pipeline.
Electrical Development
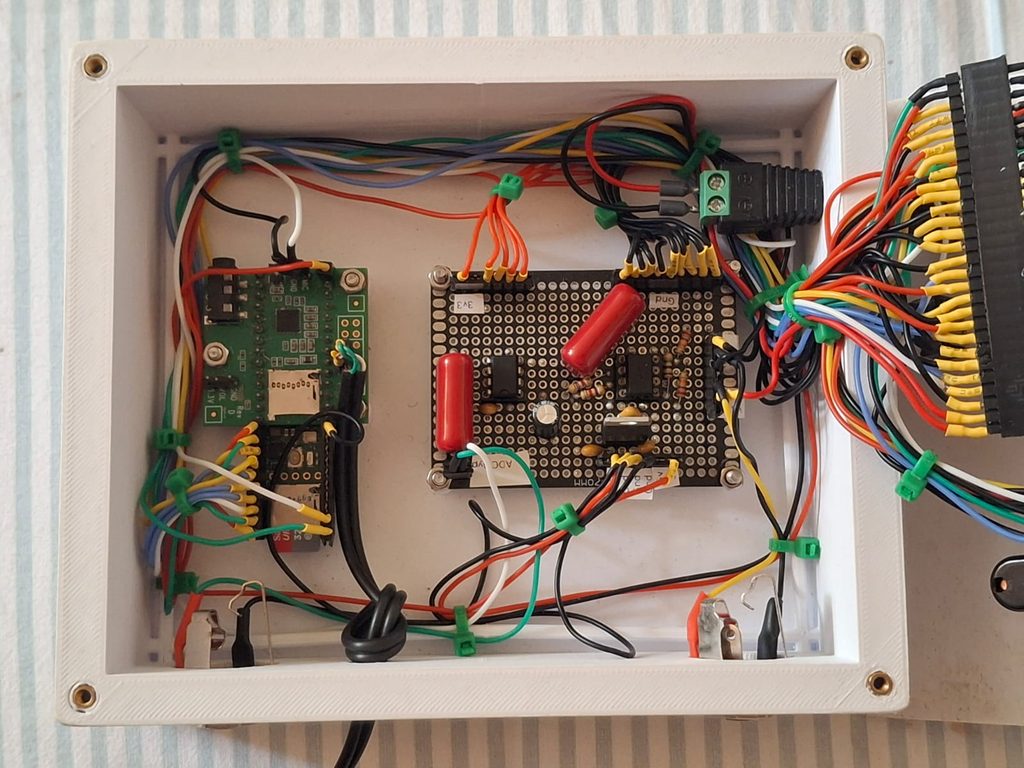
Once the microcontroller had been selected, I designed the analogue circuitry responsible for interfacing the guitar signal with the digital audio system.
One of the key requirements was to ensure that the pedal could safely and reliably interface with different guitars and amplifiers. The analogue input and output stages therefore needed to provide appropriate buffering and signal conditioning while maintaining good audio quality.
I designed simple op-amp-based buffer circuits using the TL072. Because the circuit operates from a single supply, the AC audio signal needs to be biased around half of the supply voltage. I generated this bias voltage using a voltage divider followed by another op-amp buffer.
AC coupling capacitors are then used to prevent DC bias voltages from being transferred between the guitar, pedal, and amplifier. I used 1 µF polypropylene film capacitors for this purpose.
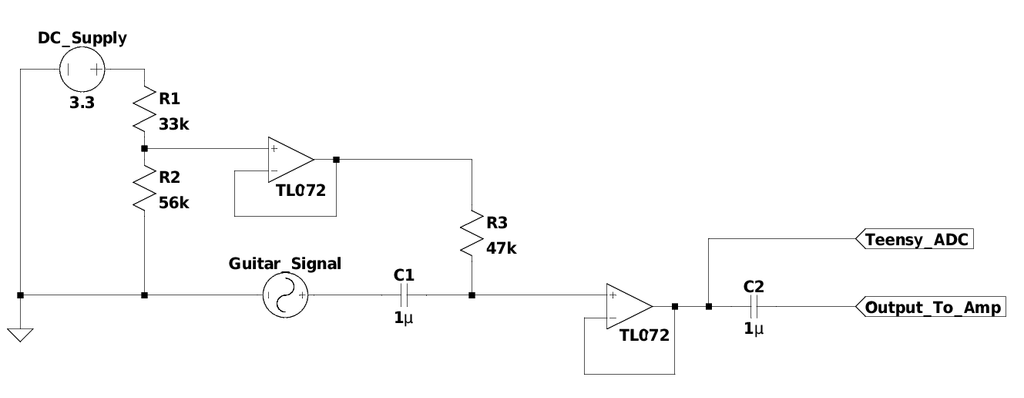
The input signal is buffered before being passed to the Teensy audio system, while the appropriate output path is similarly conditioned before being sent to the amplifier.
With the analogue circuitry established, I then allocated the Teensy’s digital and analogue input pins to the physical controls on the pedal.
User Interface
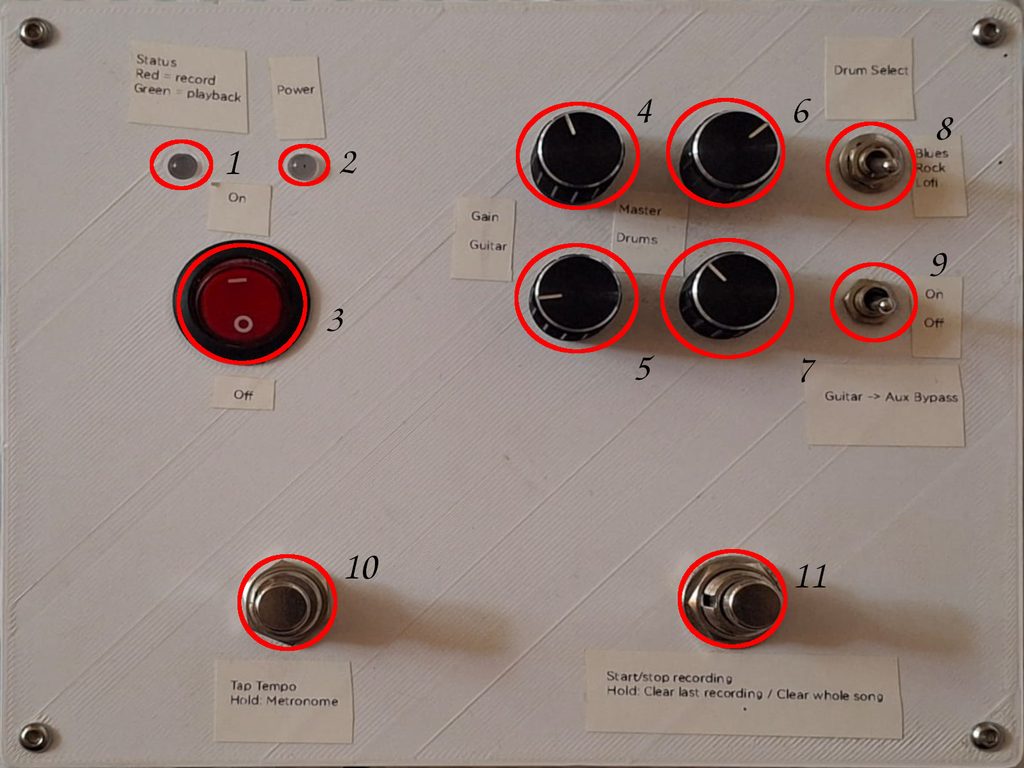
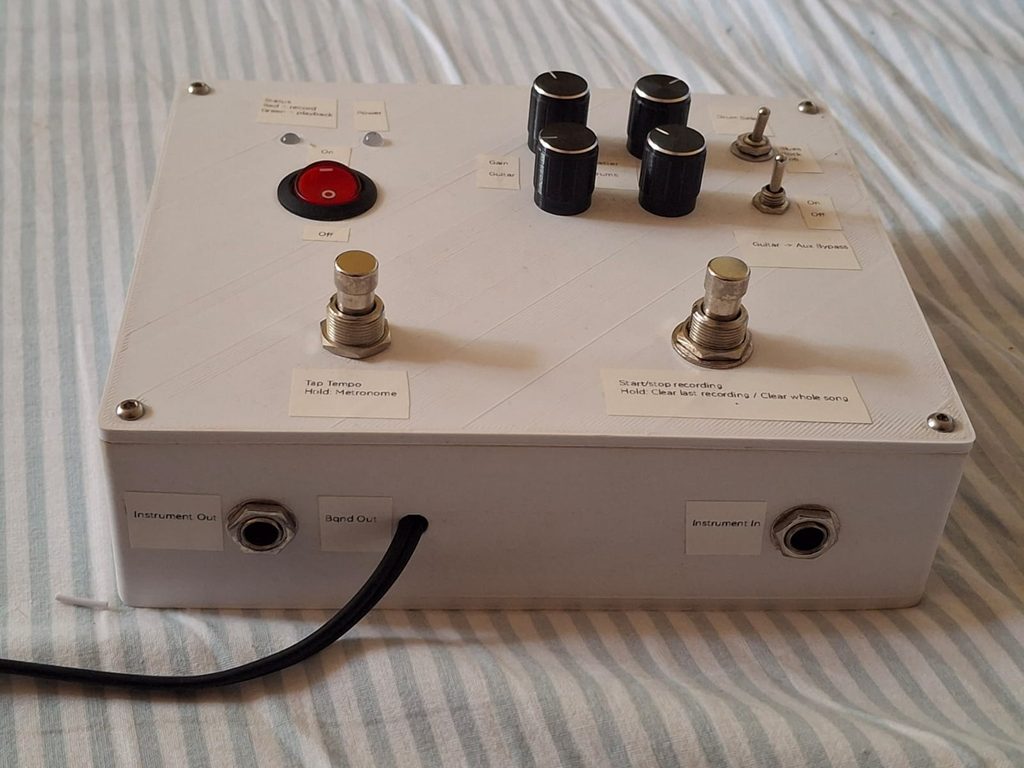
The pedal needed to be simple enough to operate while playing guitar, so I deliberately focused on a small number of physical controls.
The final interface consisted of:
- Status Indicator – A green light indicates playback, a red light indicates recording
- Power Indicator – Turns on when the device is switched on
- On/Off Switch
- Input Gain
- Guitar Output Volume
- Master Output Volume
- Drums / Metronome Output Volume
- Drum Selector – Blues / LoFi / Rock
- Guitar -> Aux Bypass – Turn on to hear what the box hears
- Tempo Button – Tap to set tempo / hold to toggle metronome
- Record Button – Tap to start/stop recording / hold to clear last recording / hold twice in a row to clear whole song
The result is an interface that can be operated almost entirely with the guitarist’s feet, while the knobs provide the controls that are less time-critical during playing.
Software Development
The software was written in C++ using PlatformIO and the Arduino framework.
Because the project involved several independent pieces of functionality—audio recording, playback, tempo management, drum playback, button handling, state management, and logging—I wanted to avoid building everything into a single large program.
I therefore applied standard object-oriented design principles, including the Single Responsibility Principle, and used the Observer Pattern to allow components to communicate without becoming tightly coupled.
This architecture made the system easier to debug and extend, which became particularly important as I encountered the challenges of developing on a resource-constrained microcontroller.
Component Architecture
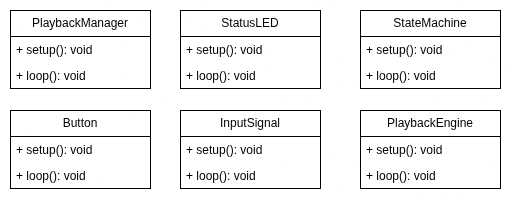
Because I was using the Arduino framework, the main program flow is built around the setup() and loop() functions. setup() runs once when the microcontroller starts, while loop() executes continuously for the lifetime of the program.
I used this structure as the basis for a simple component architecture. Each major piece of functionality was represented by a class with a specific responsibility. Components implemented their own setup() and loop() methods, which were called from the root-level program.
This kept the main program relatively small while making the execution order of the different components explicit. It also made logging and execution tracing easier because each component had a clearly defined place in the overall program flow.
I deliberately kept component registration manual rather than building a more sophisticated dependency-injection or registration system. Adding a new component therefore required explicitly instantiating it and calling its setup() and loop() methods.
While this approach introduces a small amount of manual bookkeeping, I felt that the simplicity was appropriate for the scale of the project.
The biggest advantage was separation of responsibilities. Each component contained a relatively small amount of functionality, meaning I could develop and test features incrementally. When something went wrong, there was a much smaller area of code to investigate.
Observer Pattern
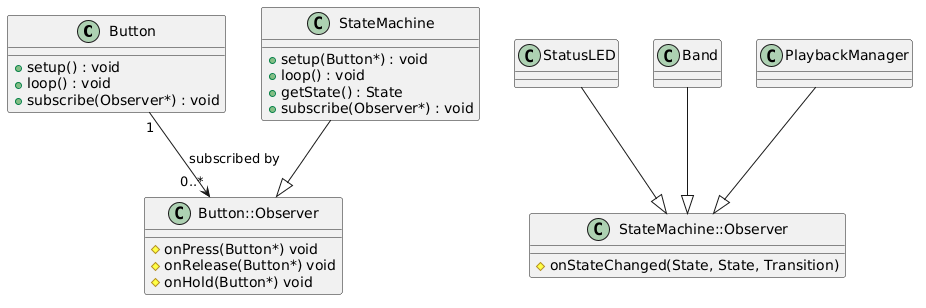
Although the components had separate responsibilities, they still needed to communicate.
For example, the state machine needs to transition from PLAYBACK to RECORDING when the user presses the recording footswitch. However, button handling belongs to the button component rather than the state machine.
This creates a common software-design problem: components need to communicate, but tightly coupling them would make the system harder to maintain.
I solved this using the Observer Pattern.
Components that generate events – such as buttons – maintain a collection of observers interested in those events. Other components can register themselves as observers and receive callbacks when an event occurs.
This creates an event-driven communication mechanism while keeping the components themselves decoupled.
For example, a button component knows that a button has been pressed, but it does not need to know what the rest of the application should do about it. The state machine, audio system, or another component can independently subscribe to that event and implement its own response.
This meant that changes to an event handler did not require changes to the component generating the event. Multiple components could also respond to the same event without the button component needing to know anything about them.
Logging and Debugging
One of the biggest differences between embedded development and conventional software development became apparent when debugging the pedal.
I am accustomed to using runtime debugging tools such as PDB and GDB to inspect program state and follow execution. While microcontroller debugging is certainly possible, it is more constrained, particularly when dealing with timing-sensitive audio processing and memory corruption.
I therefore built comprehensive logging into the system from the beginning.
A central Logger class provided a common interface for components to emit diagnostic information. For example:
- Buttons could report press and release events.
- The tempo system could report its calculated tempo.
- The state machine could report state transitions.
- Audio components could report important runtime events.
Centralising this functionality had an unexpected benefit when I encountered serious memory issues.
At one point, memory problems caused the microcontroller to crash before it could finish transmitting its diagnostic messages over the serial connection. To make debugging more robust, I added support for writing logs to the Teensy’s SD card.
Because the logging implementation was centralised, this change required modifying only the Logger class. None of the components producing log messages needed to change, and existing logging statements automatically became available through both Serial and SD-card output.
I also added a debug flag so that logging could be disabled outside development environments, reducing unnecessary processing once the pedal was being used as a finished product.
This turned logging from simply a debugging convenience into an important part of the system’s development infrastructure.
Key Takeaways
This has been one of the most interesting projects I have completed because it combines several areas of engineering that I enjoy: hardware, analogue electronics, embedded software, digital audio, and software architecture.
More importantly, it is a project with a genuine end user – me. I still use the pedal more than a year after completing it, which makes it particularly satisfying to have built something that has remained useful beyond the development process.
The project also exposed me to some of the unique challenges of embedded development. Memory errors and buffer overflows are significantly more difficult to diagnose when the result is not simply a crashed application, but an unresponsive microcontroller or corrupted audio system. A single invalid memory access can result in behaviour that appears completely unrelated to the original bug.
The most important lesson I took from the project, however, was that engineering is fundamentally a resource-allocation problem.
With only one developer (myself) I had to balance feature development against the time required to debug and maintain the system. I recognised early that debugging could become the biggest risk to the project. A rare, difficult-to-reproduce bug could potentially consume many more hours than implementing an additional feature.
As a result, I deliberately invested more time in the architecture than might have been strictly necessary for a project of this size. The component-based design, Observer Pattern, and centralised logging system all increased the initial development effort, but they reduced the cost of debugging and extending the system later.
That trade-off proved worthwhile.
Rather than optimising purely for how quickly I could implement each feature, I optimised for the overall development lifecycle: making bugs less likely, making failures easier to diagnose, and keeping individual pieces of functionality small enough to reason about independently.
For me, that was the most valuable outcome of the project. I didn’t just build a guitar pedal – I gained a much better understanding of how software architecture, hardware constraints, and engineering trade-offs interact when building a real embedded product.